How To Store Fabric Scraps
Do you want to have fabric scraps that are neatly arranged and can be showed off like on Pinterest?
There is a difference between the pure crafter and crafters who are also active in social media. The crafters who are active in social media record the process and the result. They have to manage to produce the best result of their creations, as well as the best photos and videos. Tidying up the sewing corner becomes very important. A lot of them also add some decorations to make it more beautiful.
The main cause of messy sewing corner is fabric scraps from sewing activity leftovers. A lot of busy crafters just wrap the fabric scraps in some bags, waiting for anyone to take it. They don't have time to tidy up the sewing corner. It seems impossible to see neat boxes like photo backgrounds on Pinterest and Instagram, let alone the same size fabric scraps stacked neatly in the boxes.
However, if you have time, neatly arrange the layout will help bring up the ideas of the next project. Especially for a new crafter like me, who hasn't received many orders. I still have time to explore the characteristics of my work. Although using the same sewing pattern, each person has a different preference so that his trademark appears. Therefore, when I tried a new model, I only adopted the basic pattern. If I copy all the details, I will feel strange with my own work.
Baca juga: Cara Menyambung Kain Perca Memanjang
Baca juga: Cara Menyambung Kain Perca Memanjang
Arranging fabric scraps in a certain size also requires many containers and a large shelf. Therefore, I simplify the size in just a few containers. This idea was helped by a beautiful Malaysian blogger at The Little Mushroom Cap. She arranged the fabric scraps very neatly by dividing them into size categories. Since my container is not much, I simplify the category.
 |
| Fabric scraps organizing by thelittlemushroomcap.com |
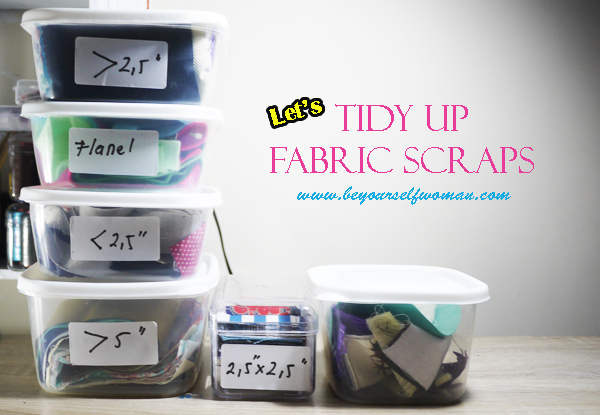
So, I only divide the fabric scraps category into sizes: <2 .5="">2.5"; >5"; felt; special shapes (circles and triangles).
The use of inch size is not solely because of following the blog, but due to the fact that there are still many sewing craft patterns in English use inches in size. Actually, there are also many patterns in Indonesian and using centimeters, it's just not easy to find on internet searches. If you want to get these patterns, you have to enter groups and communities on social media. This is what I sometimes didn't have time to.
The use of inches is not a hassle at all even though my @beyouprojects products are sold in centimeters. This is because Indonesian people like size with even numbers, except 1 and 5 cm. So if it is converted in centimeters there will be odd leftover. But that doesn't need to be thought about because it can be used as the width of the hem. Actually I have never converted the unit of measurement with a calculator. I only looked at the position of inches and centimeters across the ruler or tape measure. From there we can immediately aim at the centimeter that is parallel to the size of the inch. Easy!
Baca juga: DIY Membuat Coaster Dari Perca
Baca juga: DIY Membuat Coaster Dari Perca
Cutting with a rotary cutter and cutting mat will make the fabric scraps neat and has a precision size. Using scissors makes the edges of the fabric inconsistent. But I only have the cutting mat, I don't have a rotary cutter yet. So I use scissors. Luckily I don't have a plan to learn quilting in the near future that requires precise fabric size. Later, if I think about learning quilting, then I will just buy a rotary cutter.

Cut thick paper with a width of 2.5 "and 5". Free length. This size is to accelerate patchwork grouping so you don't need to measure it one by one with a ruler or meter.
Group 1, felt. Felt is not grouped by width because even very small felt is still useful. Because we don't need to measure it, we take the felt first from the fabric scraps stack.
Group 2, round and triangle. Round fabric scraps can occur if they are measured incorrectly. Whereas a triangle shaped can often occur when making a bag or pouch with the boxy bottom end.
Group 3, width smaller than 2.5" with free length. Now, we use the measuring instrument so that the work is quickly completed. No need to pay attention to the neat edges.
Group 4, whose width is between 2.5 "to 5" with free length.
Group 5, whose width exceeds 5 "with free length.
Basically, I just straightened the edges of the patchwork grouped. I did not cut to a certain size because I did not have the idea to make anything with the cloth. It's a shame if it's already been cut, it turns out I need another size. However, the remaining deposits of the fabric are not immovable. For example for sizes above 5 ", I can still use it to make pouches or coin purses. Whereas small sizes can be used to hang bag rings or to end zippers.
Step 1: Prepare a measuring instrument
Cut thick paper with a width of 2.5 "and 5". Free length. This size is to accelerate patchwork grouping so you don't need to measure it one by one with a ruler or meter.
Step 2: Grouping Fabric Scraps
Group 1, felt. Felt is not grouped by width because even very small felt is still useful. Because we don't need to measure it, we take the felt first from the fabric scraps stack.
Group 2, round and triangle. Round fabric scraps can occur if they are measured incorrectly. Whereas a triangle shaped can often occur when making a bag or pouch with the boxy bottom end.
Group 3, width smaller than 2.5" with free length. Now, we use the measuring instrument so that the work is quickly completed. No need to pay attention to the neat edges.
Group 4, whose width is between 2.5 "to 5" with free length.
Group 5, whose width exceeds 5 "with free length.
Step 3: Tidy up
Basically, I just straightened the edges of the patchwork grouped. I did not cut to a certain size because I did not have the idea to make anything with the cloth. It's a shame if it's already been cut, it turns out I need another size. However, the remaining deposits of the fabric are not immovable. For example for sizes above 5 ", I can still use it to make pouches or coin purses. Whereas small sizes can be used to hang bag rings or to end zippers.
Step 4: Storing Fabric Scraps
I use transparent containers that can be bought at supermarkets at low prices. I bought this one with a price of around Rp 50,000,-, a pack containing 12 pcs. You can also use used cookie jars, used salad containers and other used take-away food containers. The important thing is transparent and can be stacked to save space. I don't like drawers because it is troublesome if you want to dismantle the contents. Don't forget to put a label that is easily visible for easy pick up.
Now our sewing corner can be neater, wider and smoothen our work. Have a good time!
Thank you for visiting the beyourselfwoman blog.
Post a Comment for "How To Store Fabric Scraps"
Post a Comment
Dear friends, thank you for your comments. They will be appeared soon after approval.